Saturday, December 14, 2013

A peek at bathroom progress


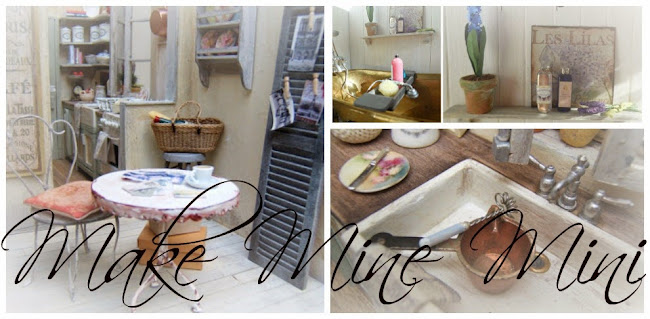
The bathroom is still very much a work in progress. Some of you will remember the dilemma I had about the gold shower unit-brass bathtub combination  -  together there was just too much 'gold' going on... I think they look much better now that the shower/tap unit is painted a dull pewter. 


The toilet seat and base have been repainted grey. I think the softer colour suits the room better. It's also been moved to the opposite corner as a trial (everything is held in place with tacky wax until I'm sure about the relocation). 


This corner is almost invisible from the window, which is the only way it'll be possible to see into the room at all soon. I don't think that really matters because the toilet isn't the most interesting/attractive thing in a bathroom anyway and if it's moved I can put a chair at the end of the bath and maybe stack it with towels. If you have an opinion on the relocation please feel free to share it, I'm always interested in, and appreciate, other viewpoints. (The cabinet can't be moved any further to the right because the door opens back into that space.)


The cabinet can be seen through the window so it's worth dressing it up a little. It's made from cardboard, except for the the top which is basswood with a circle cut into it so that the bowl (which was stolen from the kitchen) could be recessed into it, just the rim sits above the counter. The taps (which were ripped out of a kitchen sink unit) have been aged a little by dabbing on some matt pewter paint with a fine brush. The drain is made the same way as in the kitchen sink, it's the flat half of an eyelet set glued on. The middle is painted black, allowed to dry and then a good dollop of PVA is put on top of that. When it dries it's translucent and looks like a little water is trapped there.  The staining on the wall is strong tea brushed on liberally, it runs down and gathers in the crevice at the top of the little board at the back so that it looks like this has been a problem area for the cleaner for a very long time! 

The pink canister is by Mercedes (Liberty Biberty), the tiny bottle from Synnove. I'm loving being able to bring these little treasures out of boxes and into the light of day as this house slowly becomes 'lived in'. 

***********************

The post with information on how I made the old fashioned toilet from a modern one is here - it's as easy as 1 2 3!


Friday, December 13, 2013

Salon mirror


This mirror proves the old adage "keep a thing long enough and you'll find a use for it". It's been in my stash for 30+ years and cost 29c - I know that because the price sticker was still on the back. It was made as a handbag mirror but I bought it because I thought it might come in useful as a dollhouse dressing table mirror but it has lain unused for all these years - until now! 

It was an exciting moment when I realised that the mirror and the angels embellishment would fit above the fireplace - it wasn't planned, it's just 'dumb luck', or maybe serendipity.  

Thursday, December 5, 2013

A mini birthday

It was my birthday yesterday. The highlight was lunch at Perons in Double Bay with my wonderful daughters-in-law and grandkids.

As well as little treasures of the human kind my day involved little treasures of the dollhouse kind, specifically Carrie Lavender's Lady Carlyle jug and the tiny roses compact, pictured on the left below (images from Carrie's Etsy, published with her kind permission) ...

... and Mini-ologie magazine which is a feast of inspiration and delight - although it does seem a little weird to be looking at images of a winter Christmas when it's full-on summer here! Click here for their website.  I'm enjoying perusing the digital download for the moment while waiting (with excited anticipation) for the paper copy to arrive. 


Well, that's three posts in four days! Definitely a record for me! Thanks for all your nice comments about the marbling and the chaise, I haven't had a chance to respond to most of them yet but they are all greatly appreciated.


Tuesday, December 3, 2013

Two little projects: marbling and a cardboard chaise


I looked at a few images of marble on Google to get the idea of how marbling should look and here is the result on the salon fireplace mantle


If you've ever though of trying it just go for it! I started with a layer of black then sponged on 3 different shades of dark grey in patches (changed the colour by mixing increasing amounts of grey and white into the black I started out with).  For the 'veining' is used a slightly diluted light grey and a soft brush with very few bristles, twisting it a bit as I went and that's what created the various widths within of the lines. They I added some very fine lines of off white over the grey veins here and there. Be sure to continue the veins over the edge of the piece. It's not nearly as hard as it looks and if it doesn't turn out right the first time just paint over it and start again. 

When I was stuck in the apartment because of the ankle injury a few months ago I made this little chaise. 


Because I couldn't get down to the basement workshop to use wood and power tools I was stuck with just cardboard, specifically box board because I didn't have any matt board at the time and couldn't get out to shop. I forget exactly what I used for the back legs, a couple of bits of thin table legs I think but I'm not entirely sure. The roll in the chaise body and the cushion insert are balsa dowel. 

The biggest mistake I made was using a piece of scrap dress lining fabric for the upholstery, it's shiny, synthetic and wasn't nice to work with (not pliable enough) but it was the only bit of green that I had and that's the colour I wanted. I'd never use that type of fabric again, no matter how much I thought I wanted a particular colour. Green was my colour of choice because I was thinking of putting it in the salon and thought that it might be nice if a piece of furniture in there echoed the green in the kitchen since both are on the same level but after all that trouble I have now decided it's going the Brocante

That's it for today :)  Next to come are the salon mirror and something on the bathroom but don't expect it too soon - two posts in two days is one thing - three in three is something entirely different! 

Monday, December 2, 2013

Additions to the roombox

I was really shocked a couple of days ago when I looked at the date of the last post!  How quickly time flies!  I have done a few little things which I'll post about in the coming days but I wanted to let you see these little additions to the nursery roombox first.  

Thanks to those of you who made suggestions about filling the empty space on the back wall. In the end I decided on a copy of the bus roll type canvas my daughter-in-law had made which records our little girl's birth details.  (For privacy purposes some of the info has been air-brused out in this picture).  The original canvas is a much brighter pink, I had to alter the colouring because it just didn't fit in here, the colour is also a bit lighter and softer than it looks in this picture and blends in better. 


Sorry I forgot to take the photo before I put the plastic front on - hence the reflections.

The other addition is the tiny silver baby cup that was gifted to me by Synnove way back in June 2010 as part of a swap we did.  I had some trouble locating it in my boxes and boxes of treasures so I was absolutely delighted when I found it again after taking the photos for the previous post.  


Synnove isn't active on her blog these days but it's still well worth a visit. She has the most delightful and inspiring French house that you're sure to love - click here to take a peek. 

I promise I'll be back soon to share a few things I've been working on and give you an update on the French apartment.