Thursday, May 26, 2011

Giveaway winner

The draw was done by my big brother who is celebrating a 'significant' birthday today :)
All the names were put into one of his prized possessions, a World War 1 flying helmet...


Just to make sure he couldn't see any of the names we held it up high...


And the winner is Mona - congratulations!! 


Mona has a lovely giveaway on her blog at the moment, click here to visit her.

Mona, please email me your address so that I can post your prize to you - normabennett@hotmail.com

Some of you will be familiar with my brother already as he's appeared here before :)


Monday, May 16, 2011

Creating a weathered look on exterior paintwork

No pretty pictures for this post which is an extract from the "Complete Dollhouse Building Book" published in 1982. 

I made these notes many years ago from a copy in the public library of my hometown in New Zealand and they've been tucked away in the back of one of my dollhouse 'how-to' books ever since.  Susan's (Tabitha Corsica) recent comment about removing coats of acrylic  from painted miniatures using acetone reminded me about it and I thought some of you may find it useful. Please note that I've never tried it so I don't guarantee the results nor recommend the method as such - I'm just sharing the information as I have it.

FOR "WEATHERED" PAINTWORK

Materials: water based house paint (NOT artist acrylic), linseed oil, buffing cloths, extra fine black sandpaper, paste wax, oil based wood stains (grey, blue and brown), brushes.

1   Paint house, including doors and windows (these may be stained).  Allow to dry completely.

2  Rub a small amount of linseed oil over the entire surface using the buffing cloth - some painted surfaces may fade a little.

3  Decide on areas to be weathered.  Apply grey stain with same buffing cloth. Rub into wood.  Follow with brown and blue stains - overlap in some areas to create intensity and visual dimension.

4  As stains soak in lightly rub some areas (eg sections of window frames and doors - as well as walls themselves) with slightly wet sandpaper so portions of original wood show through.  Apply another light coat of oil over exposed areas and reapply small amount of stain, rubbing well into wood.  ALLOW TO DRY THOROUGHLY - BEST TO LEAVE IT FOR A FEW DAYS.

5  Repeat process in areas where not enough.  In areas where too much sand lightly and start again, beginning by painting raw wood.

6  As a final step apply paste wax to areas chosen for greatest weathering.  Now buff smooth, will look as if wind has worn away some of the wood. 

If anyone tries it maybe you could let me know what you think.

Source acknowledgement: "Complete Dollhouse Building Book" (1982), Faulk and Griek (ISBN 0-672-52339-6).  (I did email Kathryn Faulk who I believe many be one of the authors seeking permission to publish this extract about 10 days ago.  I have had no reply as at the date of publishing this post.  This post will be removed if any objection from either the authors or publishers is received).

Tuesday, May 10, 2011

Pretties from Jollie and my surprise Mother's Day gift

click to enlarge
A few weeks ago I asked Jollie (A Little More Minis) if she'd be interested in doing a swap, some of her pretty tulips in exchange for something for her fairy house and here they are in the cutest little shabby jug along with some lovely shabby dishes she's made.  We had in mind that they'd go into the French apartment but they look so at home here in the 1:16 kitchen they may well stay.  A special little surprise was this pretty, delicate wreath which is also in the 1:16 house for the moment.   
Everything is so lovely, thank you Jollie!  As usual I'm way behind on fulfilling my end of the bargain - making something for fairies has taken some thinking about but I bought some supplies today with their little gifts in mind :) 

And look what I got for Mother's Day  ... a Dremel 300 + attachments!!!  I bet not too many mothers got power tools on Sunday :) 

Of course I'm as pleased as can be with it - all I have to do now is learn how to use it, preferably without amputating any fingers!!  I'll keep you posted.

Thanks again to Jollie and to my wonderful family, I'm so lucky to have such perfect gifts. 

Friday, May 6, 2011

Playing with patina "DIY" from ultra grunge to prettyish

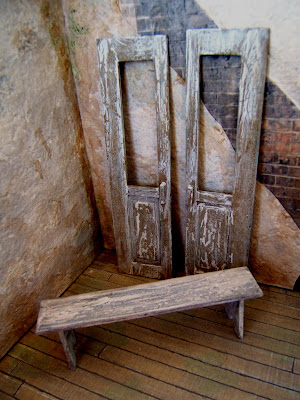
The finish on these doors is my attempt at patina similar to the real cabinet in a previous post (two below this one).  Reproducing the aged finish on these doors was a bit of a challenge as they'd already been painted - originally dark green and then repainted in dark French grey.  The first challenge was to cover the grey with a colour resembling raw wood, that was achieved with a mix of acrylic paint and wood stain.  After that was dry it was covered with a thick coat of crackle medium which was left overnight to dry thoroughly.  The top coat is a very pale grey, almost white.  When that was dry on the surface, but not thoroughly right through, it was rubbed over with a damp cloth.  In some cases the paint was almost removed, in others just the surface, and some places not at all.  The same technique was used on the bench plus a coat of 'dirty wash' (a mix of mostly water with a little black acrylic paint added). The staining on the 'plaster' wall was done with fairly strong coffee - you might recognise the wall and floor- it's the brocante, but not as clean looking as you've seen it before :)
 
Like most budget 'ready-made' furniture this chair started life stained and varnished.  OK for some settings but of course I couldn't resist getting out the paint brush and giving it a bit of grunge/age.  It was first sanded a bit then had a couple of coats of gesso followed by a few coats of light cream and then a thinnish grey wash.  Wear spots were sanded then it got a 'dirty wash' made from a little dark brown stain and lots of water.

The cutlery tray is balsa lightly stained with a thin solution of a water based wood stain (before putting a water based stain onto a piece that has been glued together with a water based adhesive wait until the glue is well and truly dry or it will fall to pieces!  -  I found that out the hard way). This does raise the grain a bit but since we're looking for an aged look, not perfection, I don't think it matters.  I guess you could give it a light sand if you want. It was then painted with French grey acrylic paint thinned with quite a bit of water (which will tend to raise the grain again so I suggest you just relax and live with it). A slightly thicker coat was added here and there to get 'grading' of colour which imitates uneven wear of the painted finish. 
The stain on the back is fairly random. Extra dirty wash was 'painted' along the top where it settles into the valleys and then runs out and down the back.

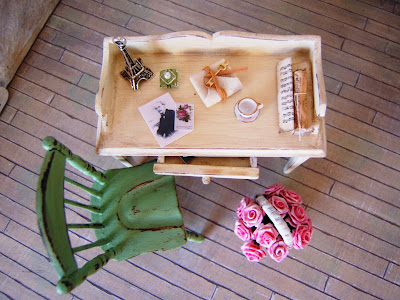
Something a little prettier, the desk is another piece purchased already stained and varnished, it was treated in a similar way to the chair above but without the grey wash.  This chair originally had a pine-look seat and dark green back.  After a light sanding it was painted with a 2-3 of coats of dark brown followed by several coats of light green, each one a slightly different shade, then sanded at wear points and finished with the dark wood stain 'dirty wash'.  I'm not sure if it will stay this colour or get a few coats of grey wash.  

The roses are cheap ribbon roses, I'm sure you've seen bunches of them in craft supply stores.  The original colour was a very bright pink.  They've been painted with a thick coat of gesso, it soaks into the ribbon in a random way giving nice uneven shading.  I think these make nice big shabby roses to add a little colour here and there. The basket was a natural colour that I covered with gesso.   You've probably guessed by now that gesso is a favourite of mine! 

I hope this will encourage a few of you to play with some 'cheap and cheerful' purchased or handmade pieces to create an individual look.  They don't have to be grunged/aged as much as some of these, just go for colours and finishes that will suit your settings.  Most of all just have fun

~left click the pics to enlarge ~

The white journal on the desk is by Glenda at Peppercorn Minis - she makes them in various sizes and colours to suit different settings and scales, she sells them in her Etsy store (linked on her blog) for a very reasonable price.

The portrait on the desk is one of my maternal great grandfathers, 'keeping it in the family as usual :)

Wednesday, May 4, 2011

400 Followers giveaway draw


To say "thanks for following" I'm offering these pieces in a giveaway draw,  you must be a Follower of  "make mine mini" to enter.  The new option of  'follow by email' complicates this somewhat -  it doesn't seem fair that only those registered with 'Google Friend Connect' can enter.  So if you Follow by email please email me to be entered into the draw, otherwise please leave a comment here.

The last date to enter is May 25, I plan to make the draw in New Zealand on my brother's birthday, May 26.  I'm flying over on the 25th to stay with my him for a few days to celebrate his birthday and as a bonus I hope to get to meet up with Carolyn (Carolyn's Little Kitchen) and Mercedes (Liberty Biberty).

Good luck everyone!! 


PS If you wish to post about this giveaway on your blog you are welcome to do so :) 

Monday, May 2, 2011

Welcome to new followers - and yes I have noticed the number is at 400+ so maybe it's party time

I'm always happy to see new faces pop up on my Followers list  and where I can I like to return the visit and see your blogs too.  Quite often recently when I go to the profile page of new Followers there is no blog showing which means that I can't repay your visit.  If you've joined my blog over the past few weeks and you have a blog that I haven't been by and left a comment there then please check your profile settings - and please leave a comment here that includes your blog address so that I don't miss out on dropping by to see what you're doing :)

At the time of posting the Followers number has nudged over 400 so there could well be a giveaway announcement shortly to celebrate and to say "thanks for dropping by" - watch this space!!