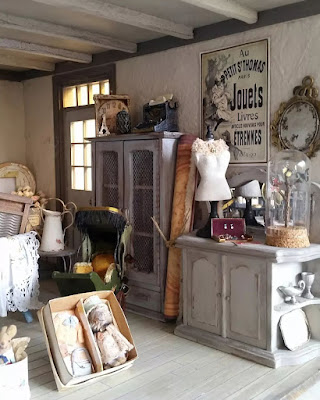
I'm pleased to FINALLY be able to give you an overview of the Parisian Brocante, the repository of many treasures from around the world It takes up the full ground floor beneath the apartment. Some pieces will move off to other projects and new ones will take their place so it will be a permanent 'work in progress'. I'm having fun rearranging things, and remembering the special people and happy times associated with many of them. When I post close-ups I'll include the names of their creators, for now please just have a look around and perhaps imagine you're browsing in your favoutie Parisian Brocante. Take your time, you can rest and refresh soon enough at your favourite cafe, sipping your coffee and watching the world go by.
Showing posts with label French style. Show all posts
Thursday, February 17, 2022
Sunday, November 14, 2021
Salle à manger update
There have been a few changes in la salle à manger, thanks in large part to the generosity of talented friends.
Pretty tea cosy is by Linda Park, cute little cupcakes are from Elizabeth of Studio E.
Handbag, parcel (which may well contain ham or cheese for the picnic) and cool dotty shoes are by Linda Park. Linda made the shoes to match a pair of loafers I had at the time, girls just gotta have fun 😊
All packed for a picnic - let's hope the little mouse doesn't get into it first! I found him in an interesting shop that sold vintage and newly made treasures near Bastille Market in Paris. He was made in Toulouse and was part of a selection of miniature porcelain animals. Basket is by Lidi Stroud and was a birthday gift from friends a while ago. Plates are purchased, packet of croissants by Elizabeth, all other contents are by Linda Park.
A close-up of Linda's grapes and radishes - that little mouse is getting a little close for comfort!
I hope you've enjoyed a look at the Paris apartment salle à manger again. More apartment updates are to come.
Monday, May 11, 2020
French bedroom - major progress ...
This is the current 'state of play' in the French apartment bedroom, it's taken a long time to get this far!
I started fiddling with possible furniture placements in 2015!
This was at the beginning of lots of moves with full-time housesitting so it was put into storage for a while at that point and didn't come out again until 2016 when I started playing around with wallpapers finally settling on the pink before it went back into storage AGAIN.
Fast-forward to 2020 and we finally have a completed room, same wallpaper, same chest of drawers, same dressing table and chair (although the chair has undergone some 'surgery', details on that at a later date) different bed, armoire instead of the corner cupboard.
The bed is painted with Annie Sloan 'Old White' Chalk paint then aged with a wash of strong tea. I printed the fabric to match the wallpaper.
The very handsome little is cat by Alice Zinn, I've named him Gillou.
The red toile hatbox is by Marg Taylor (Argus Minis on Etsy), the pink one by me.
The be-ribboned box is by Bea she's on Etsy at Le Miniatures di Bea, the ballet slippers that are hanging on the back of the door came in this box.
The chair is painted and upholstered by me, the seat fabric is silk dipped in tea to age it. The cushion and mats are printed by me too. A chair in the same style is available in my Etsy shop (the framed Marie Antoinette portrait will be available soon). I wasn't sure how the chest of drawers was going to come out when I put the dark grey coat of paint on it but I'm happy with it, the patina is achieved by dry brushing with pale grey. I like that there is a little piece of the gold trim missing on the front of the top drawer, it hints that this piece of furniture has seen a long life. Never mind the expression "if walls could talk", imagine if furniture could talk - what tales a piece like this would have to tell!
The lovely lamp is from Marg Taylor. The beads were a gift from Susanne who sadly left this world early this year. Some of you will know Susanne from her blog and Facebook as Petite Brocante. We started blogging around the same time so were online friends for quite a few years and I have very happy memories of spending time with her in Denmark in 2017. It's very special to have some of her work in this room and elsewhere to remind me of her creativity and warm heart. She is deeply missed.
The fabulous boudoir vanity tray is from my dear friend Linda Park, some of the bottles/jars are by Elizabeth @ StudioE. Linda blogs (occasionally, certainly not as often as we'd like) at Linda's Mini World - she's a fantastic miniaturist and I'm so lucky to be the recipient of lots of her lovely work including some beautiful petit point slippers (below).
The ballet slippers are by Bea ( Le Miniatures di Bea), ballet skirt by Susanne, amazing leather shoes are by Patrizia Santi (Website).
I love the stockings and wish I had more as they add such a nice touch but unfortunately I have no idea where I bought them, they've been in my stash for a very long time.
Box by Bea (Le Miniatures di Bea)
The dressing table and chair from Vilia Miniature (Etsy) (Facebook) were a special request birthday present from my family a few years ago (the chair has been altered, the back and seat were originally upholstered).
The beautifully made basket is by Lidi Stroud, Basketcase Miniatures (Facebook), linen bundle is a gift from the talented Elizabeth @ StudioE. The pretty paper roses are by Lea Frisoni (Facebook) (Website) (Etsy), they are a special reminder of meeting Lea at the Paris show in 2017.
The lamp is by Brooke Tucker.
The pretty, delicate, pink perfume bottles are also by Elizabeth @ StudioE.
The exquisite silver is from Russian silversmiths Shew Jewelry House. It was a highlight of our 2017 travels to meet one of their team members, Dmitri Shevenko, in St Petersburg when I collected some of their silver for myself and a couple of friends. They are IGMA members and in 'normal times' attend some of the European shows. To visit their website click here, they have an amazing range of high quality miniature silverware from small inexpensive pieces to show-stopping tea services.
Most of the room will stay as you see it here but I've decided to swap out the smaller white bed for the larger one with the faux cane ends so watch this space for the update. Ceiling lights still have to be installed as well but that's going to have to wait for the moment as I'm busy preparing new furniture and accessories for my Etsy shop ready to trade from there in an online Australian Miniatures and Dollhouse show on 7-8 June.
Thanks for taking a room tour with me - I hope you enjoyed it as much as I've enjoyed working on it, albeit in small instalments over a long time.
Saturday, July 2, 2016
Giveaway winner!
Congratulations Catherine (Kilmouski & Me), you are the winner of my blog Followers draw. Can you please email me.
Thanks so much to everyone who played along, a pity there can be only one winner because you're all appreciated.
Tuesday, June 28, 2016
Disappointment follows elation...
I was so excited when I found an image of a piece of old French tapestry that I could duplicate to make wallpaper for the French apartment bedroom - such a lovely scene of ladies enjoying a day in the country.
BUT when it's viewed from a distance the ladies disappear and the pale background with the tree in it becomes dominant and it just looks 'blah' at best and 'yuck' at worst. I'm so disappointed.
Enlarging the images so that it's easier to see the detail from a distance is an option I suppose but it'll make them rather out of scale I think. The paper is only held on the walls temporarily so easy to remove but it's such a disappointing result.
Back to the drawing board ... after I dry my tears.
Saturday, September 19, 2015
A different perspective
This isn't the most attractive view of the Brocante and two floor apartment but it does put the building as a whole into perspective. Today's job is to drill the holes and make wiring grooves for the lighting in the middle floor hallway, living room, kitchen and dining space and then do the same for the top floor. Theoretically the interior should all come together quite quickly once that's done.
Some of the bits and pieces from the kitchen shelves came loose 'in transit' and are now in a box waiting to be glued in shortly.
Friday, September 18, 2015
Not all change is good!
There have been a lot of life changes since my last post. Both of us are now retired, we've moved out of our Sydney apartment, disposed of all of our furniture and so on, put personal belongings in storage and are now full-time house/petsitting. Of course most people who live this type of nomadic lifestyle don't have to move a three level dollhouse and mini-making equipment with them so that aspect is a little challenging but otherwise we're enjoying the experience.
In regard to my many many boxes of mini stuff working out what to store and what to take was a bit of a challenge and I did make a few mistakes (like forgetting the box of door handles) but mostly I have with me what I need for the moment. I'm concentrating on finalising lighting decisions and finishing the walls and floors on the third floor (hallway, bathroom and double width bedroom).
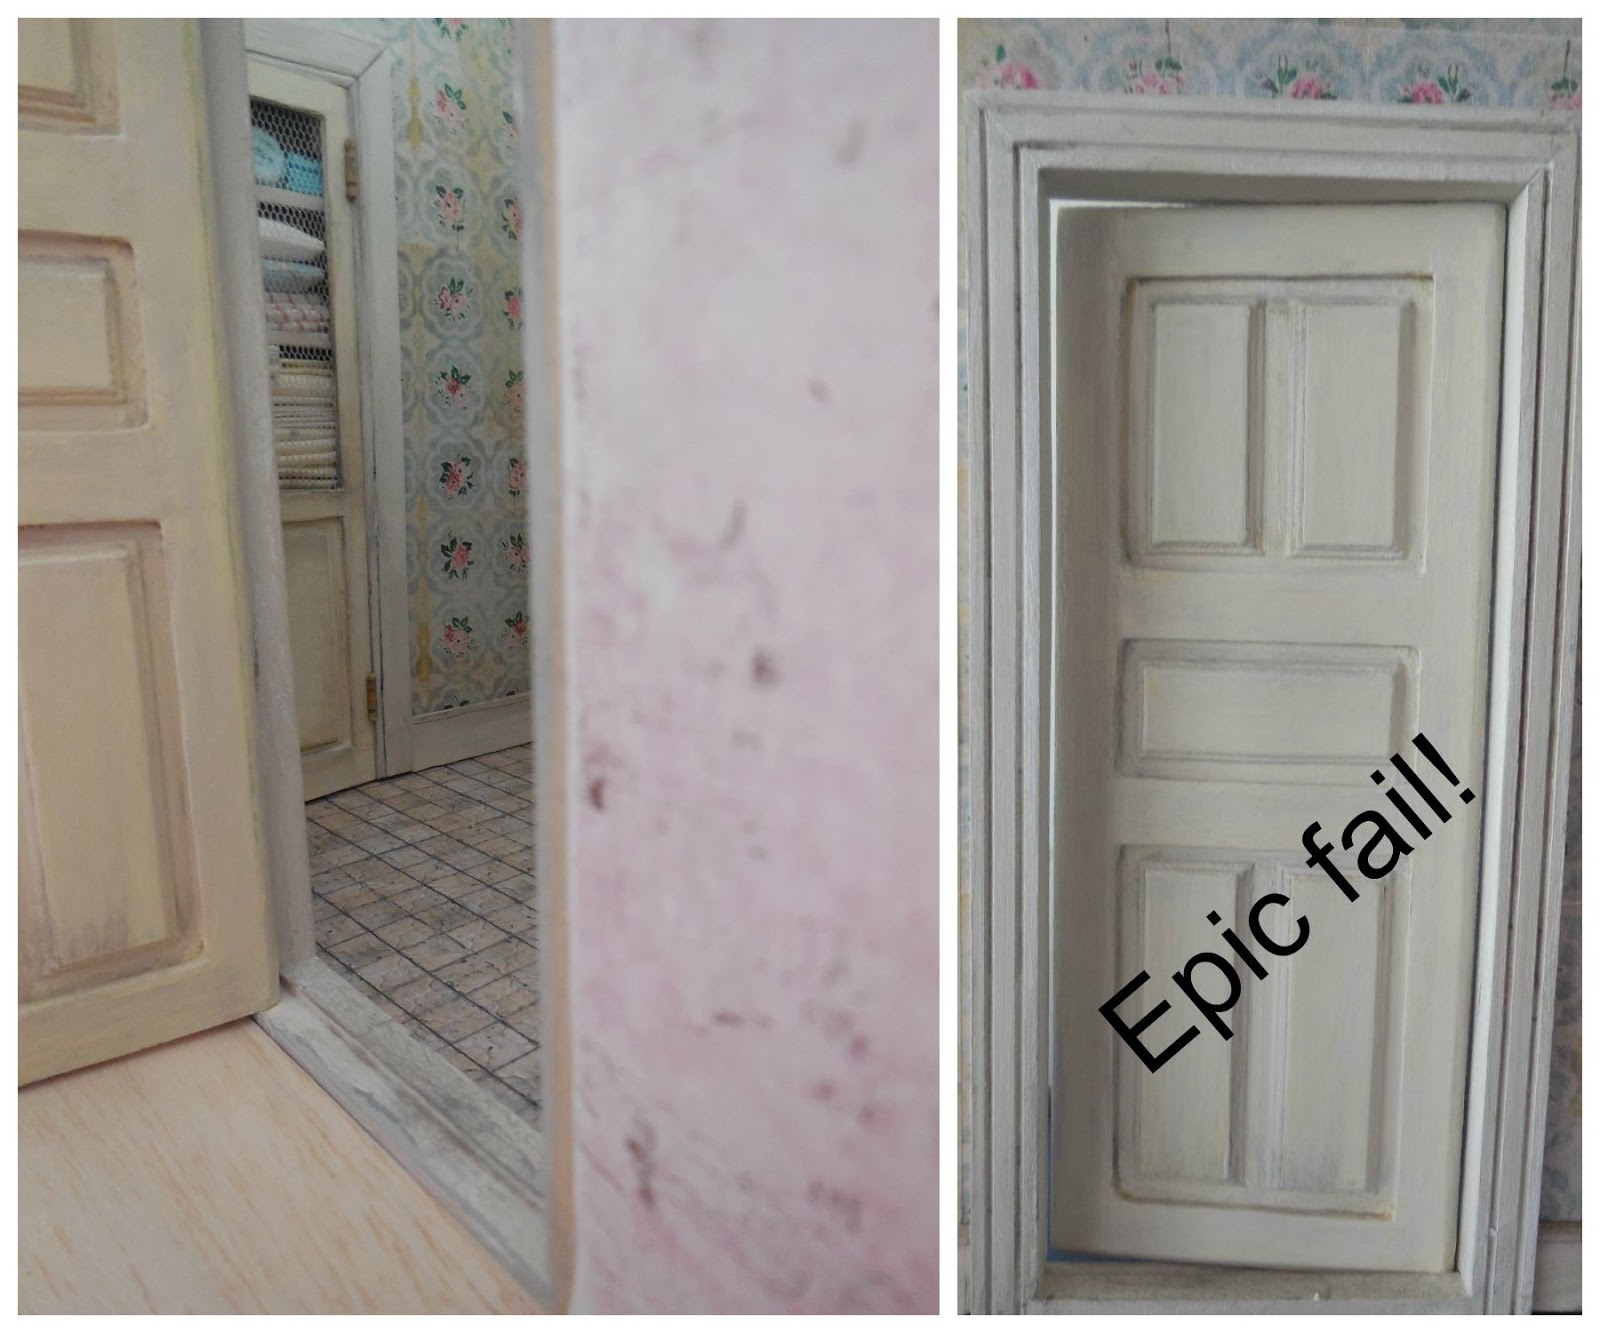
Below left is a mock-up of the bedroom interior. The grey door has had more coats of paint on it than most of us have had hot dinners! It was previously green on both sides (with multiple shades and coats involved in that too) but I decided to change to grey on the bedroom side. Quite liked the result (left) after a few coats, washes and sanding but decided this morning to give it a final coat of 50/50 pale grey paint and matte glaze to soften it, result on the right.
I think it still needs just a hint of dry brushing with a little bit of green on the lower panels so that it looks like the grey has worn and allowed a little of a previous coat of paint to show through, but otherwise I'm pleased with the softer look and will try to resist playing with it again.
However, sometimes change is not a good thing and I really should leave well enough alone!! I don't know why I thought for even a second that it was a good idea to put a coat of the light grey 50/50 glaze on the cream hallway side of the door as well, but I did. Now, keeping in mind that it took me AGES to get this side of the door (which was also green) to pretty much match the cupboard door which was done months and months ago, this is clearly one of the stupidest and logic defying changes I've ever made. Honestly, sometimes I should be supervised!!
Given the number of times I do and redo, and redo again (and again!) it's no wonder it takes me so long to complete a project!
Tuesday, April 7, 2015
Aged paint finish on the salon walls
7 days and 7 coats of paint later, including several washes and some sponging, I think the salon walls are pretty much as they need to be although I might try an almost transparent wash of gloss medium and light green to counter the slightly too flat/chalky finish. The variations are fairly subtle so I hope you can see they actually are there, but then that is the idea really, if they were too obvious I would have totally failed. It should look aged but not like several different painters, all with different paint pots, have been let loose after entirely too much red wine!
Next step is reconstructing the room and decorating it - yay! the fun bit at last - I can get all sorts of delicious bits and pieces out of their boxes and into their 'home'.
Wednesday, April 1, 2015
Painting the salon walls
I always planned that le salon in the French apartment would be off white, not as white as in the mock-up with the furniture, but white none the less, So why then did I find myself reaching for the green and grey paint this afternoon to mix a custom colour that is definitely not white? That's not the first time this has happened, the dining room was going to be grey but instead I found myself painting the walls cream - ok, they did get several coats of grey was here and there in the layering process but they're certainly not grey!
This is just the first of many coats of paint on the salon walls, each one will be ever so slightly different to the one before with some coats sponged on, others in an almost transparent wash- why can't I just follow the sensible regime of 'one undercoats, two top coats', it would make life so much simpler but as soon as the paint brushes come out I have to get all complicated and time consuming!
Who knows what colour it'll be in the end...
Friday, January 30, 2015
Sharing the Facebook 5 day Art Challenge - Day 2
I've been nominated by Frederica @ Frederica's Little World and Lorraine @ Fairy Meadow Miniatures to participate in the Facebook Art Challenge showing 3 pictures each day for 5 days and in turn nominate another artist to do the same - today I nominate Mely Giunta.
Paint, patina and ageing isn't just for furniture,
it's also for old Parisian kitchens
and hallways that are having problems with damp
and flower pots, and angels, and old bistro chairs
| Basket by Lidi Stroud |
Thursday, January 29, 2015
Sharing the Facebook 5 day Art Challenge - Day 1
I've been nominated by Frederica @ Frederica's Little World and Lorraine @ Fairy Meadow Miniatures to participate in the Facebook Art Challenge showing 3 pictures each day for 5 days and in turn nominate another artist to do the same (I nominate Lidi @ Basketcase Miniatures today). Participating in the Art Challenge is a great way to kick off my miniature activities for the year so I thought I'd share here too.
As you know I love vintage, miniatures, everything French, creating 'aged' paint finishes and printing miniature scale fabrics so what could be more fun than combining them all...
Friday, May 23, 2014
French bathroom, almost finished
For such a tiny room this bathroom has been a LONG time in the making but I wanted to get the details 'just right'. (Once the adjoining walls are installed it will be a major exercise to access the room to change anything.) With the exception of the sign everything on the shelf came from Synnove almost exactly four years ago, at last they're out of the little box and basking in the rays of the morning sun. The vintage-look 'metal' sign is an image printed on cardstock, edged with dark brown ink to create the rust effect, and covered with several coats of clear nail polish which gives it the look of having an enamel finish (although it doesn't really show up in the photo).
Upper hallway (almost) hidden cupboard
The image on the left shows how the bathroom looks through the window, and if you look through the doorway you can see part of the upper floor hallway. On the far wall you can just see the cupboard. It will be almost entirely hidden from view when the wall that divides the hallway from the bedroom in front of it is put in place. The only possible glimpse will be through the bathroom exactly as you see here. I suppose it could be considered, then, that it was a waste of time doing anything with this cupboard at all but I really wanted to do it properly for my own satisfaction. It's very shallow (about 1 cm only) but I wanted to try out creating the illusion of proper depth. I think it's worked fairly well.
I hope you've enjoyed these little peeks, hopefully I can bring you final pictures of both the bathroom and the hallway soon. It'll be such an achievement to have FINALLY completed the back of the house on this upper floor that I think some kind of celebration will be in order!
Saturday, December 14, 2013
A peek at bathroom progress
The bathroom is still very much a work in progress. Some of you will remember the dilemma I had about the gold shower unit-brass bathtub combination - together there was just too much 'gold' going on... I think they look much better now that the shower/tap unit is painted a dull pewter.
The toilet seat and base have been repainted grey. I think the softer colour suits the room better. It's also been moved to the opposite corner as a trial (everything is held in place with tacky wax until I'm sure about the relocation).
This corner is almost invisible from the window, which is the only way it'll be possible to see into the room at all soon. I don't think that really matters because the toilet isn't the most interesting/attractive thing in a bathroom anyway and if it's moved I can put a chair at the end of the bath and maybe stack it with towels. If you have an opinion on the relocation please feel free to share it, I'm always interested in, and appreciate, other viewpoints. (The cabinet can't be moved any further to the right because the door opens back into that space.)
The cabinet can be seen through the window so it's worth dressing it up a little. It's made from cardboard, except for the the top which is basswood with a circle cut into it so that the bowl (which was stolen from the kitchen) could be recessed into it, just the rim sits above the counter. The taps (which were ripped out of a kitchen sink unit) have been aged a little by dabbing on some matt pewter paint with a fine brush. The drain is made the same way as in the kitchen sink, it's the flat half of an eyelet set glued on. The middle is painted black, allowed to dry and then a good dollop of PVA is put on top of that. When it dries it's translucent and looks like a little water is trapped there. The staining on the wall is strong tea brushed on liberally, it runs down and gathers in the crevice at the top of the little board at the back so that it looks like this has been a problem area for the cleaner for a very long time!
The pink canister is by Mercedes (Liberty Biberty), the tiny bottle from Synnove. I'm loving being able to bring these little treasures out of boxes and into the light of day as this house slowly becomes 'lived in'.
***********************
The post with information on how I made the old fashioned toilet from a modern one is here - it's as easy as 1 2 3!
Friday, December 13, 2013
Salon mirror
This mirror proves the old adage "keep a thing long enough and you'll find a use for it". It's been in my stash for 30+ years and cost 29c - I know that because the price sticker was still on the back. It was made as a handbag mirror but I bought it because I thought it might come in useful as a dollhouse dressing table mirror but it has lain unused for all these years - until now!
It was an exciting moment when I realised that the mirror and the angels embellishment would fit above the fireplace - it wasn't planned, it's just 'dumb luck', or maybe serendipity.
Tuesday, December 3, 2013
Two little projects: marbling and a cardboard chaise
I looked at a few images of marble on Google to get the idea of how marbling should look and here is the result on the salon fireplace mantle
If you've ever though of trying it just go for it! I started with a layer of black then sponged on 3 different shades of dark grey in patches (changed the colour by mixing increasing amounts of grey and white into the black I started out with). For the 'veining' is used a slightly diluted light grey and a soft brush with very few bristles, twisting it a bit as I went and that's what created the various widths within of the lines. They I added some very fine lines of off white over the grey veins here and there. Be sure to continue the veins over the edge of the piece. It's not nearly as hard as it looks and if it doesn't turn out right the first time just paint over it and start again.
When I was stuck in the apartment because of the ankle injury a few months ago I made this little chaise.
Because I couldn't get down to the basement workshop to use wood and power tools I was stuck with just cardboard, specifically box board because I didn't have any matt board at the time and couldn't get out to shop. I forget exactly what I used for the back legs, a couple of bits of thin table legs I think but I'm not entirely sure. The roll in the chaise body and the cushion insert are balsa dowel.
The biggest mistake I made was using a piece of scrap dress lining fabric for the upholstery, it's shiny, synthetic and wasn't nice to work with (not pliable enough) but it was the only bit of green that I had and that's the colour I wanted. I'd never use that type of fabric again, no matter how much I thought I wanted a particular colour. Green was my colour of choice because I was thinking of putting it in the salon and thought that it might be nice if a piece of furniture in there echoed the green in the kitchen since both are on the same level but after all that trouble I have now decided it's going the Brocante.
That's it for today :) Next to come are the salon mirror and something on the bathroom but don't expect it too soon - two posts in two days is one thing - three in three is something entirely different!
Subscribe to:
Posts (Atom)